So you’ve just been to a party and woken up with a throbbing hangover to find your iPhone screen is cracked. Familiar story? It’s happened to me, too many times! Fret not though, it’s really easy to replace a cracked iPhone screen and can be done for just a fiver!

Buy a replacement iPhone 3GS screen glass and tools
eBay is your best bet, I got my kit for just £5.50 which includes the screen glass, adhesive pads and all the tools you need to carry out this tutorial. Just make sure you check the sellers feedback for people who have also bought the kit, there are some bad replica screen glass’ available.

How to fix your iPhone 3GS cracked screen
1.Remove the two screws from the bottom of your iPhone. These are located next to the dock connector, remove these with a mini Philips screwdriver and make sure you put them in a safe place. Labelling which screws are for what is a good idea.
2. Lift the iPhone screen away. Using the plunger you got with your kit, place it just above the home button and carefully try and lift the screen out from the casing, you may need to use a tool to prise it out from the sides, but be careful doing this as you can damage the seal.
If your kit doesn’t contain a plunger, put a mini screwdriver or other tool between the screen and rubber and try to lift it out. This method is not recommended, as it’s very easy to damage the rubber seal.
If your kit doesn’t contain a plunger, put a mini screwdriver or other tool between the screen and rubber and try to lift it out. This method is not recommended, as it’s very easy to damage the rubber seal.

3. Lift the screen back from the iPhone casing, be careful, as it’ll still be attached.
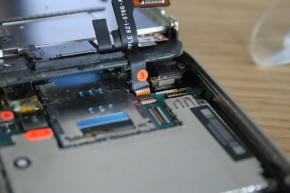
4.Disconnect the cables. There are three cables to disconnect from the iPhone itself; these are numbered 1,2 and 3 (number 3 is hidden below number 2). Number 1 and 2 cables are easy to remove, simply lift them out from their connectors using the wedge tool.

5. Be careful removing number 3. Number 3 is a little more difficult to remove and you can damage your iPhone if done incorrectly. It’s clamped into place, in order to remove it you need to release this clamp. To do this, slide the wedging tool or another plastic apparatus underneath the cream-coloured clamp and flip it up 90 degrees. This is the clamp released. Be sure to flick the clamp back down to prevent it from getting damaged while we replace the iPhone screen.
6. Remove 6 Screws. Three of the screws are located on one of the metal frames sides, two on the other side and one is located in the top right.

7.Prise the LCD screen out from the frame. Once the screws are removed you can use a wedge tool or small screwdriver between the LCD and glass frame to separate them.

8.Remove the cracked and broken iPhone screen glass. This is probably the toughest part of the tutorial, removing the glass. I would recommend using gloves for this step unless you want small shards of glass in your hands. Best way to remove the glass is to forcefully push it out or smash it even more with a screwdriver so it’s easier.
9.Clean the iPhone frame up. Make sure you remove ALL the left over adhesive residue and pieces of glass from the frame. A heat gun can help with this, but be careful not to melt the plastic frame.
10.Apply your new iPhone screen glass. With your kit you should have some double sided tape cut to size or adhesive, carefully apply this to the frame making sure you don’t cover any of the sensors or buttons. Reapply the new screen glass to this, pushing down to ensure it is located perfectly and is secure, give it a couple of minutes to set if using adhesive.Reassemble the iPhone. In the methods we took it apart, do these in the reverse order.

- Attach LCD frame back to glass frame, secure with 6 screws.
- Lift the clamp and slide number 3 cable back in, reapply clamp. This can be tricky, straighten out the cable by pushing down on it with a wedging tool while holding number 1 and 2 cables with your thumb and then slide it into position.
- Reconnect number 2 and number 1 cables. This is simple, you just need to push down on them so they slot into their connectors.
- Put the screen back onto the phone. Insert the screen from the top (where the screen is connected) and close it at the bottom. It should fit comfortably; now push down to make sure its in position.
- Secure the two remaining screws in the bottom.
No comments:
Post a Comment